Pages

Sunday, May 31, 2015

ARTFUL JOURNEYS - WEEK #22

You can RESIST -- but this week we don't want you to actually resist.  We want you to USE A RESIST on a watercolor journal page.  It is fun. It is challenging and YOU CAN DO IT!


Using a RESIST in art is easy for the most part, I suppose depending on the type of resist you are using.  For our purposes, the resist is applied to the page in a design or form the artist desires in an effort for the paint to RESIST the paper.  This week we want you to use any resist you like (or experiment with them all!) and watercolor.  Generally speaking, you will apply your resist to your page first, let it dry if necessary, and then apply the watercolor.  If you have to remove the resist, do it after your watercolor paint dries. You can create a page separately and tip it in to your journal later or do the work directly into your journal (depending on your paper, of course).

You can find 100's if not 1000's of resources on Pinterest and Google for paint resists.

There are many, many things that can be used as a resist in art:  Masking fluid, crayons, oil pastels, hot glue, PVA glue, Rubber Cement, masking tape, stencils, chipboard, etc.... and likely more.... that will keep the paint from adhering to your paper wherever you put it.


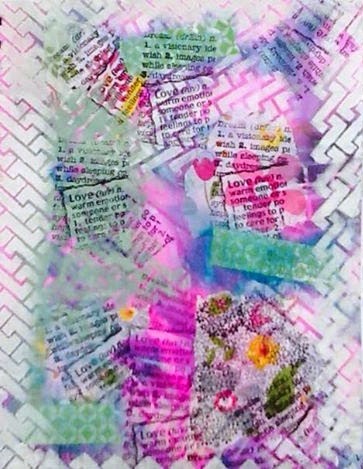
Lynn is up first this week with her very pretty page.  Here's what she had to say about her first attempt with a watercolor resist:

"Hi everyone!  Well, first off, this is the first time I have ever done resist and watercolor so I did struggle with this. I much prefer paint over water colors and as for the water resist well I have to admit I didn't like that very much either. First thing I did was get a stencil that filled the page and colored all the little lines--which took forever--with the white crayon. Let it sit for a bit and added the lilac watercolor. It was to light in some spots and to dark in others. Lol  The favorite part for me was stamping the flowers and adding a couple of word cards that I had. I am glad I tried this prompt but won't be doing it anytime again soon. Thank you for looking. " ðŸ’™

 (Betty's note:  I am not clear on what Lynn meant when she said "water resist" but will try to clarify with her tomorrow. She goes to bed as the sun is setting so I can't ask her now since she has been asleep for hours!  ha.  Could be she wasn't clear on the concept of resist work).  


Melody is up next with another beautiful page and a very creative way to use her resist of choice.  See her full spread and read all about it on her blog, here


Shana is showing off all her artist talents again this week with her beautiful work.  Stop by her blog and visit, here


Betty has taken the bull by the horns this week with resists.  Check it all out on her blog, here


We really appreciate you taking time from your day to stop by each of our blogs and hope that you enjoy the work that has been put into preparing these prompt-spirations for you.  We do it because we love it, and we want to help inspire you and teach you as we go along.  Be sure and share your completed work over at Artful Journeys.  We will always be your biggest cheerleaders!

We're keeping it artful!

ARTFUL CHICKS
~~Betty, Melody, Tamie, Lynn & Shana

Sunday, May 24, 2015

ARTFUL JOURNEYS - WEEK #21

Happy Memorial Day weekend everyone!  Let's take a moment to remember and thank all those brave men and women of our armed forces who made the ultimate sacrifice for our freedom, and give thanks for living in a world where freedom is recognized and appreciated.  And to those of you who are active military families, thank you and your loved one(s) for your sacrifices.  You are appreciated.

WEEK #21 - CIRCLES
Our life is an apprenticeship to the truth that around every circle another can be drawn; that there is no end in nature, but every end is a beginning; that there is always another dawn risen on mid-noon, and under every deep a lower deep opens.
Ralph Waldo Emerson (1803 - 1882)

Betty here again this week with a little food for thought before we get down to some business.

Do you ever stop to think and recollect about circular things?  That there is no beginning or no end? That the circumference of a circle is the sum total of the whole?  Have you thought how our lives get wrapped around circles?  I think about these things, and often when I get into these kind of philosophical moods, I move closer, I think, to knowing my true self...the real me...the one that is deep inside, hidden away from external pressures, impressions and ideas.  In life, there is a beginning and there is an end, and if you are a spiritual person, you know that being reborn after our last earth breath is yet another circle of infinity.  We wear circles of gold and silver on our fingers, lovingly placed in marriage or commitment as a sign of infinite love, with no beginning or no ending.  We take a circuitous route when lost, back to the beginning.  Even this can have a very deep meaning.We have social circles, circles of friends, quilting circles, sewing circles, circular driveways, circular buildings; our drawing instruments are circular in nature. Wheels on our vehicles are circular.    The tub you toss your pens and markers into are circular.  How many circular things can you find within an arm's reach of where you sit right this very minute?  I would expect more than ten. Perhaps more than twenty.

But we're not on some spiritual or philosophical quest this week with our prompt.  I just thought I would give you something to ponder and reflect upon, and how circles can and do infiltrate our daily lives in the smallest and largest of ways.  Maybe you will reflect upon these circular thoughts while preparing your journal spread or spreads this week.  There's nothing limiting you to just one spread per prompt you know!  I definitely made more than one, but none are deep or spiritual.  Just some circles, with some different techniques and media.

Have fun with the prompt this week.  Go deep. Go light.  Go spiritual.  Wax and wane prophetic if you want.  Collage circular things.  Draw up some perfect or perfectly wonky circles, but include those circular orbs and brighten up your day, and ours.  

The fabulous, beautiful & talented Lynn Jackson made this awesome spread this week. She really had her mixed media art mojo going......and here's what she had to say about it:

"Doing these circles made me very happy because I seem to struggle with every prompt we have each week but this one was so easy. 
The background color is Apple Barrel lime green and topped that with the pretty Indian Turquoise then started drawing the circles in black and outlining them in the white pen.

Arrows used are a rubber stamp and all the sayings are from the Unity Stamp Company.
Please check out what the other girls are up to. We all have such different styles and all awesome. Thanks for looking. " ~~ Lynn


Tamie Rodriguez Wilson has really rocked the prompt this week, in her usual "flippin' fabulous" style.  Check it out here


Melody Elzy whined to me all week she was struggling with this prompt. At first, I just laughed at her, but then when I realized she was serious, I encouraged her to push through her really mean inner critic and take a different approach and to stop over-thinking it. We talked about a couple of different methods and she produced something.....well, beautiful!  She's still not happy with her spread (she's letting that mean inner critic get to her this week), but I can tell you it is perfectly perfect and has Melody's fantastic artistic touches all over it.  Scoot over to her blog and check it out here


Shana Roberts Conroy joined our team this week,  and we are so proud to have the benefit of all her artistic talent, ideas and excitement about the groups and the team!  We are very pleased to present her first prompt as an admin, and a treat for you! Shana made an awesome video quite some time ago and we are pleased to share it here for your viewing pleasure for this week's prompt.  We didn't really give her much notice for doing a spread, but this 17 minute vid is definitely worth your visit!  You can check out the video here.


And lastly, my contributions for this week's prompt can be found on my blog, along with images of some of the other work I have been up to in the wee-hours of this week.  Check it out here


Now go out there and make some circles.  Get one with the circular universe!

We're keeping it artful!


ARTFUL CHICKS
~~Betty, Melody, Tamie, Lynn & Shana

Saturday, May 16, 2015

ARTFUL PROMPT: WEEK #20

Hi everyone!  Betty here this week!  Do you see how fast this year is speeding past us?  Local kids will be getting out of school soon, summer is upon us, and picnics, backyard BBQ's, entertaining and family gatherings will be taking place all over the country.

And what do we need with all the great food we will be serving this summer?  Right.  NAPKINS. Lots of paper napkins.

This week we want you to incorporate a paper napkin or serviette into your journal. 

You can use the whole napkin, parts of a napkin, you can fussy cut out a central or focal image, but we want you to gather up that selection of beautiful napkins we know you all have and use at least one of them in your journal.

There are many methods for applying your napkins or images from your napkins out there, and you should use the method that works the best for you -- whether you are doing just an image transfer from the napkin, using part of the napkin or the whole napkin and applying with medium, ModPodge, Glue or however you want to do it.

You put four women in a room and give them a project, and you will see four different end results. Just look at us.  We are always doing something totally different from each other, and you are no exception.  And don't wimp out on us.  You can do this.  I  (Betty) have gone through my process in detail on how I achieved my final look, and you can check out my spread and the process on my blog here.


Lynn made an awesome spread this week, and here's what she had to say about it:

Hi friends! Well, there seems to be a lot going on with this week's prompt. I have never done anything with a napkin before besides wipe my face and sure have never used one in mixed media but with Melody's help it was easier then I thought it would be.


I started out using pink craft acrylic, but now most of that got covered up as I was adding different paints. After the pink paint was first applied, I tore the napkin in fours and glued them down and let it dry overnight. I added some decorative tape and stenciled over the three napkin pieces. I have a "love" stamp that I just stamped random on the page.  I then took a stencil and added a border, mixing white and green paint to make a really nice, soft color and that is pretty much it. Slapping paint without a notion of how it will all turn out is a lot of fun actually. Once again I was happy with how the week's prompt turned out. Thank you for reading. ~~Lynn


MELODY is wowing us again this week with another bright and beautiful spread. Check it all out on her blog, here


And TAMIE has once again created magic out of the madness she says comes out of her head. You can have fun seeing her finished spread here 


We certainly look forward to seeing your creations on the group feed at Artful Journeys and hope that we have been able to give you some inspiration and motivation!

We're keepin' it artful just for you!

ARTFUL CHICKS
~~Betty, Melody, Tamie & Lynn


Saturday, May 9, 2015

Artful Journeys - Week #19

Happy weekend everyone. Betty here this week to clue you in to this week's prompt and give you some encouragement!

This week, your prompt is to write and incorporate a limerick onto a journal page. 

A limerick?  Yes, we want you to really use your brain for some old fashioned writing fun.  Incorporating your own writing onto your journal pages is important, even if just as a writing exercise.

A Limerick is defined as a form of poetry, especially one in 5-line anapestic (2 short syllables followed by a long one) meter with a strict rhyme scheme (AABBA) which is sometimes obscene with humorous intent.  The 1st, 2nd and 5th lines are usually longer than the 3rd and 4th.  Lines 1, 2 and 5 rhyme and lines 3 & 4 rhyme.  Limericks usually contain puns or wordplay.  The invention of Limericks are generally attributed to Edward Lear (1812-1888) who was an English humorist and painter.  If you look at a selection of limericks you will see that by today's standards, they are really not obscene, but rather a little risque' or perhaps even bawdy.  During the heyday of Limericks, many of these poems certainly might have been considered "obscene".

Limerick expert Don Marquis identifies 3 types of Limericks:

  1. A limerick that is told when ladies are present
  2. A limerick that is told when ladies are absent but clergymen are present
  3. Limericks
You can find all sort and manner of examples of Limericks on Google.  If you choose to illustrate your limerick on your journal page, all the better.  But write a limerick you must. Have some fun with it and push that creative envelope.  I think you will see that we certainly did!  Please don't just copy someone else's Limerick and add it to your page.  We really want you to write your own.  If you study the rhythmic meter of a limerick, you will see that they are really quite easy.  I wrote mine is less than 5 minutes.


Here's a sneak peek at my (Betty) spread for the week.  I hope that it brings you a laugh and a smile.  You can see the full spread and my limerick here


Melody made a fantastic limerick and spread.  All bright and vivid, and oh, so funny.  Go check it out here


Lynn and Tamie were otherwise engaged this week, so Melody and I will have to serve as your inspiration this week.  We hope you can take something positive from our spreads and then wow us with your Limerick and fun journal page.

We're keeping it artful!!

ARTFUL CHICKS
Betty, Melody, Tamie & Lynn


Tuesday, May 5, 2015

ARTFUL TACTIC - by Shana Conroy Roberts "Dealing With a Nemesis"

Betty here -- today we have a special GUEST ARTIST, Shana Roberts Conroy bringing you a delightful Artful Tactic using magazine images in your journals and making them your own.  Shana is quite the gifted and talented artist and loves sharing her "how-to's" with us via video and photo tutorials at Artful Mail Groupies and now Artful Journeys.  So let's see what she has to say and show us today!


Oh! Hello My Lovelies!! Shana Conroy here.  I am so excited to share with you and how I cope with my arch nemesis!  You can use this technique on ANY magazine image, applying the same principles.

I LOVE to paint and draw and one of the favorite things that my little nieces and nephew like to do is have Auntie Shana draw pictures. I have drawn everything from a simple stick figure family, for a niece who likes the ones on cars, to a Tyrannosaurus Rex eating a little sister (with parent permission) for a nephew. I love the ideas and imagination that they bring and the challenges that arise when it's something I have never drawn before.

The only items I dread being requested is a rose,
I cannot draw roses! They are my nemesis!


With their beautifully shaped petals, with uneven edges, slightly curled pointed tips, the deeply shadowed chasm where the base of the petals meet, and the petals are random in the way they come from the center bud but there is order to them as well. As you can see, I have thought a lot about roses and their structure, but I think in all my years of trying I have succeeded in 1 (yes 1) that I wasn't uneasy about sharing.

I am going to share with you the way I am able to incorporate roses into my art. I cheat. Yup! The way I get a away with it is that I make it mine in the end.

So here goes a lesson on cheating!!! Yup I'm Naughty! Tee Hee!


I start by gluing my picture (magazine image) onto my surface and pulling my paint. You want at least 3 colors, a light, a mid range and dark, they don't even need to be the same color, I have done this with yellow, red and purple before! Here I ended up with 4 because I want more contrast in my blues.


The trick to this is to keep your paint wet in between colors, and don't clean your brush! I usually only do one area at a time but to really show you the steps I did the complete rose for each step.

I start with my darkest color in all of the deepest shaded areas and progress through to the lightest following the transition of color in from the original image.


Darkest Color for the deepest Shadows


Add first mid-tone


Add second mid-tone and lightest color

Now remember after adding all this paint, they should still be damp and your brush still loaded with paint! If your climate is dry like mine (I live in Arizona) do 1 petal or area at a time.

With your paint still being damp, take your damp and dirty brush and blend your colors together, if you feel your brush or picture is getting dry just dip the tip of your brush in your water, don't dunk it, a little goes a long way.


Blended Rose


If you feel you have lost some contrast, don't be afraid to pick up more color to add but just a touch of additional color on the tip of your brush, if you do pick up too much, don't clean your brush just wipe the excess on your pallet, just look at my pallet, I am always picking up too much!


If you are better at learning through example take a look at the video I made to go along with this blog entry when I painted the 1st rose in my journal! 


This is what the completed journal spread ended up looking like, the face is also a Paintover cheat!


If you would like to see the video of the rest of the journal entry check out this video!


I hope this helped you in your Artful Journey!
Big hugs and Mushy Stuff! 

- Shana (a.k.a wisccheeto)
My Blog


Sunday, May 3, 2015

Artful Journeys Week 18 - Go Fly a Kite!

Hey, y'all, Melody here this week, and let me tell you, I was SO excited to finally get to this week's prompt....Go Fly a Kite!!!!!!  One of the happiest memories of my childhood was going to the park with whatever new kite my mother brought home for me, and getting to fly it.  Of course, growing up in Oklahoma, flying a cheap-o dollar store kite is WAY easier said than done, but for whatever short amount of time I could keep it in the air, I was in heaven!

So, here is my take on our prompt this week....I hope you'll hop over and take a peek.


Lynn gave us this little beauty for this week's prompt, saying:

"Go fly a kite?  I decided to fly 2 of them. 
I started out using Dina Wakley's heavy body paint in turquoise but the color seemed off, so I  grabbed the Americana Indian Turquoise and painted over the Dina and liked the blend much better. 

I just happened to buy a pack of wood kites the other day that was marked down in price,  hoping they would come in handy, and by golly they did.  For the clouds I used a stencil I had on hand, and the bike was sent to me by a group member. I thought a butterfly was in order,  so I added one.  I am VERY happy with this weeks prompt."


Miss Tamie had a LOT of fun with her page for this weeks prompt....take a look at her process here!


Our wonderful leader will be checking in later with her take on the prompt, but please go see what we have for you so far, and be sure to leave the girls some love!


05/04/15 - Betty here, at last.  My week last week was fraught with rental property disasters and I had little to no time for art.  As a child, I loved flying kites. I was never very good at it, but try we did every time the wind wasn't blowing too hard.  My brother taught my sister and I how to make our own kites out of newspaper and some balsa wood (he is so smart!).  We never had money to buy very many store-bought kites, so any kind of kite we could manufacture we were in heaven. Summers spent at my maternal grandmother's house in Oklahoma always yielded the most time, and most open spaces for kite flying.  I always felt so "free" when controlling that kite.

I brayered on my background colors (blue cotton, sky blue, antique white and parakeet green), really roughly, hoping for a more water-colory effect.  The tree trunks I "scratched" on with the dropper from my brown Dylusions Spray ink, and painted the tree leaves with watered down craft acrylic paint in Spring Green and and Hunter Green.  The kites were cut from some scrap gelli print papers and embroidery floss added for the kite tails.  I added a little bit of personal journaling about the emotions conjured up by this week's prompt.  Hope you enjoy my interpretation.